

Legacy Manual
Tracing from a remote server

There's a better way to test remote networks.
With PingPlotter Cloud, seeing a network from another computer's perspective is as simple as clicking a link. PingPlotter's software-based agents let you test hundreds of connections at once, saving you time and money.
Learn MorePingPlotter is able to initiate trace requests from a remote agent on both Windows and UNIX based machines. The UNIX agent requires perl, a web server, and the traceroute command. The Windows agent is fully self-contained (it has its own TCP server and GUI component) and does not require any additional software or server components.
The basic concept of the remote trace agent is that it resides on a remote machine listening for a request for data from your local PingPlotter instance. When it receives a request, it does a single traceroute and returns the results back to PingPlotter, which then collects this data and displays it locally like any other trace data. The interval at which PingPlotter contacts the remote agent is controlled by the sampling parameters (trace interval) you've defined locally.
When using a remote agent, PingPlotter works and looks *exactly* the same as it does when you're using the local engine. Essentially the only difference is that the trace isn't originating from the workstation running PingPlotter, but instead the agent is allowing you to source and see the traceroute from the vantage point of the machine running the remote agent. You can even see the results from multiple remote sources/agents by defining and using Named Configurations.
Example:
Lets say that we have three offices: a "main" office in Boise, a branch in Amsterdam, and one in Tokyo. With a single instance of PingPlotter running at our Boise office, we already know that we can monitor the connection between us, and the other two offices. We can also monitor our connection from the Boise office to our business and VoIP server.
When using remote agents deployed on machines in both the Amsterdam and Tokyo office, we can now also measure the connection from both of those offices to both the business server, and VoIP server as well - all from the single instance of PingPlotter that's running back at our headquarters in Boise!
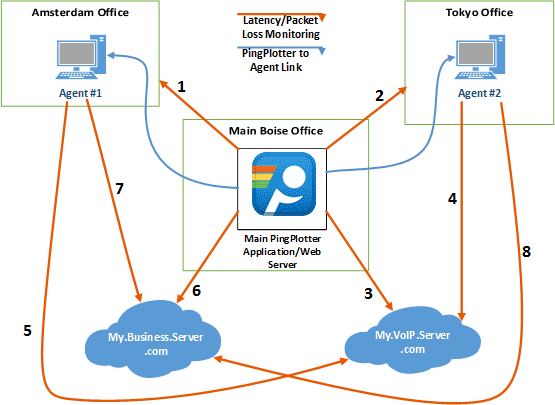
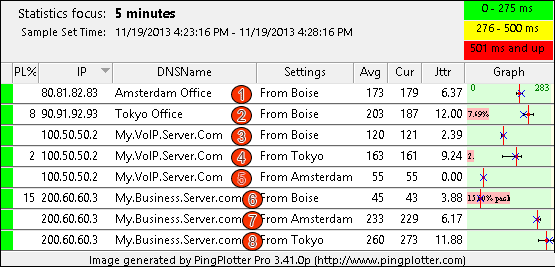
Our summary screen in PingPlotter would look something like this:
Requirements:
- PingPlotter version 3.10.0p or higher, installed.
- A Windows XP or higher workstation (Windows agent), or a UNIX machine with Apache, perl, and appropriate permissions (UNIX agent).
Installation instructions
Installing the Windows Agent
The PingPlotter remote agent for Windows is a self-contained executable that includes a small server and some portions of the PingPlotter core trace engine. This agent can run as an application or as a service under Windows XP or newer.
Note: Presently the Windows agent does not come packaged with an installer or uninstaller.
- Download the Windows remote agent from the agent download page.
- Extract the agent (PingPlotter_Remote_Agent.exe) to a working directory (e.g., c:\Program Files\PingPlotter Remote Agent).
- Browse to the directory where you extracted the agent and launch it. The agent will show up in the system tray.
- Ensure your firewall(s) allow access to the agent on TCP port 7465, or change the server port for the agent. To change the port, as well as other settings for the agent, double-click on the tray icon.
- From your PingPlotter machine, launch your web browser and access the agent at https://(your agent machine name):7465.
- Verify the output. It should look something like this (in your browser):
PingPlotter Pro Remote Windows Agent V0.8.2.18
Tracing to:
Error: Must specify an IP Address
Continue on to the Configuring PingPlotter to use a remote agent section.
The windows agent has a few options, to see about its use, see the configuring the Windows agent section.
Installing the UNIX Agent
The PingPlotter remote agent for UNIX is a perl or php script that uses the UNIX traceroute command to gather sample set(s) and pass the results to PingPlotter via a web server. Because of all the various flavors of UNIX that exist, and the possible differences when it comes to output of the traceroute command, you may need to modify the script for your particular source machine. We've primarily tested under FreeBSD and Debian. Contact us if you have problems here.
- Download the unix agent script from the agent download page.
- Extract the perl script (trace.pl) or php script (trace.php) into a web-accessible directory on a UNIX web server that is capable of serving the appropriate script.
- If necessary, set the script to be executable by your web server, (chmod 755, or similar, and don't forget to check the permissions for the directory).
- Test it from a web browser to make sure it's accessible. Example: https://www.yourwebserver.com/pp_pro_agent/trace.pl (or trace.php if you're using the php version).
- Test a full trace from the web browser. This requires the ?IP= parameter (?ip=parameter will fail, the 'IP' needs to be capitalized). This would look like this to trace to 192.168.1.1: https://www.yourserver.com/pp_pro_agent/trace.pl?IP=192.168.1.1 Ideally you'll want to use a valid IP address here, of course - one that works on the remote agent's network.
- Verify the output. If it's working, you should get output that looks something like this:
PingPlotter remote trace agent, V0.4
1 192.168.1.1 0.684 ms
You'll probably have more hops than this. This is just an example if you were using an IP local to your server.
- If you have an error, look at the source code for the script for some different alternatives and help.
Configuring PingPlotter to use a remote agent
Once the remote server(s) are configured, we need to set up PingPlotter so it knows about those servers.
Turning on the remote trace capability.
By default, the remote engine capabilities of PingPlotter are disabled. To enable them:
- Open PingPlotter, go to Edit->Options, Plugins & Scripting.
- Turn "On" the "Trace via Remote Server" script. Hit "OK" to save the settings.
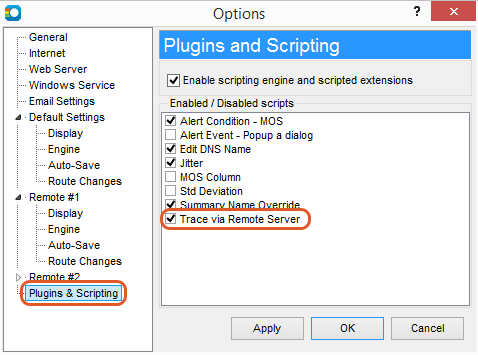
- Restart PingPlotter.
This will enable PingPlotter to do remote agent testing, but you'll need to create a named configuration for each remote agent you want to use (not each target, but just each remote agent machine).
Creating a named setting (configuration) to use a remote agent.
Named configurations are covered in more depth in the named configuration section.
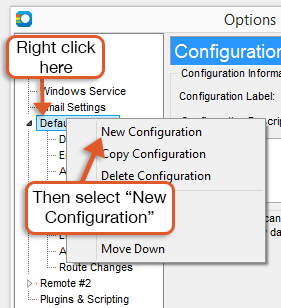
- Go back to the options dialog (Edit -> Options).
- Create a new configuration (Right-click on the "Default Settings" in the tree view and select "New Configuration").
- In the newly created configuration, change the name in the main section (e.g., "via <your server name>").
- Go to the "Engine" section of this new configuration and select "Trace via Remote Server" from the dropdown. (If this engine type is not listed, look at the turning on the remote trace capability section to enable the remote trace engine.)
- In the new section "Remote Server Source Settings", Enter the URL to the trace agent there. For a Windows based agent, the URL will look like this: https://yourservername:7465/. For a UNIX-based server, the URL will look something like this: https://yourservername/script_path/trace.pl (or trace.php, if you're using the php version).

- Hit "OK" to close the options dialog and save your settings.
Usage Instructions
Now, on the main PingPlotter screen you'll see a "Settings" dropdown below the "Address to trace" field. Pick "via (servername) ..." there (or whatever you named your configuration). Enter your target, and then click on the Trace button.

That should access your remote server and populate data into PingPlotter from that.
Warning: Your tendency will be to pick a server very familiar to you, which in a lot of cases is going to be the same server you just set up the script on. If you do this, your trace will only be one hop long!
Error handling and troubleshooting
A remote agent adds additional complexity to any deployment, and PingPlotter's is no exception to this. In an attempt to keep things as simple as possible, and still satisfy our needs, we use existing technologies - web servers, http, existing command-line tools (for UNIX, where good ones exist), etc.
This means that in most cases we're dealing with familiar territory when troubleshooting. All the remote agent capabilities can be accessed via a web browser. If PingPlotter is having problems reaching a remote agent, then you can use your web browser to check and verify. You can also use PingPlotter (not the remote agent) to constantly monitor the availability of the server and route to the remote agent.
If the remote agent is inaccessible for some reason, there is a network failure between the PingPlotter machine and the agent for example, any alerts you have configured will not fire. If you want an alert to fire, you need to set up PingPlotter to monitor the agent machine itself.
There are a number of configuration challenges that might hit you here, but these should be familiar to you if you've done much network and/or application troubleshooting. ZoneAlarm, for example, might block access between PingPlotter and the agent machine. Other firewall issues could also come up. If you view the remote agent as a web server, the troubleshooting techniques you've used elsewhere should help you here too.
If PingPlotter is unable to reach the agent, because of an authentication problem or network failure, the error will appear above the trace window on the targets it applies to. This message might be an HTML error (e.g., 401 authentication failed), or a network failure message. These events will show up in PingPlotter's time graph the same way a route change does, with the background color on the time graph matching background colors elsewhere rather than having the graph scale colors painted on.
Notes, thoughts, shortcomings...
The Windows agent uses a fully threaded engine to make working with it just as responsive as working with the local engine (if there is a timeout, other hops will still report back). For the UNIX agent, though, if hop 1 times out hop 2 won't report back until the timeout period has elapsed. This means there may be times, when the trace interval is < 5 seconds, where you see empty spots in the data that later fill in with a lost packet or a good sample. Everything works, just the results get delayed a bit. The Windows agent shouldn't have this problem.
Configuring the Windows agent
Because the Windows agent is a full-fledged server unto itself, you may want to have it behave differently depending on where you're installing it.
Server Port
The default server port of the Windows agent is 7465. If this doesn't work for some reason in your network, you can change it by right-clicking on the tray icon and selecting the "Settings..." option. Clicking on the "Apply" button makes that change immediately, and if the server is unable to start on that port an error will occur.
Security
You might not want to expose the agent to anyone or limit access to it. This can be done via the username / password settings in both the agent and the remote trace setup in PingPlotter. The authentication system uses standard HTTP basic authentication. If the agent requires a username / password, and it doesn't match what's specified in PingPlotter, an error will show up in PingPlotter. If no username or password is required by the agent, then the username / password settings in PingPlotter will be ignored.
Running the agent as a service
If you want to be able to trace from a machine at any time, you can install the agent as a Windows Service.
To install as a service, browse to the agent's install directory using a command prompt and then enter the following command:
PingPlotter_Remote_Agent /install
After doing this the agent will show up in the control panel services applet, or you can start the service manually with this command: net start PP_RemoteAgent
To uninstall the service (remember that because there is no installer / uninstaller for now, you'll need to manually remove it), stop the service, then run this command:
PingPlotter_Remote_Agent /uninstall
You can also use the "/reinstall" parameter to register the agent in a new location.
If any of these commands have an error, then you'll get a popup message telling you about that error. If you have no errors, then the command will complete with no popup messages. If you do get an error, you can check in the "PP_Remote_Agent_error.log" file to see what the error was.
Note that under Windows Vista and newer, you will not have access to the user interface when running as a service. For best results, stop the agent, run it as an application to change its settings and do testing. When you have everything working the way you expect, close the application and restart the service.
Configuring the UNIX agent
The UNIX agent is much simpler (more primitive?). It's a perl or php script that runs the traceroute command and shows the output on a web client. Because it uses an existing web server, all the settings need to be configured on that server including the server port and security.
Security
Because PingPlotter uses standard basic authentication to secure access to the agent, you just need to password protect the agent application using an .htaccess security setting (if you're using apache, which most people are). PingPlotter will send the username and password to the web server using this protocol, and it should all just work.
As always, please contact us with questions.
**The feature in this topic is exclusive to PingPlotter Pro. See our product comparison page for more details**