PingPlotter Cloud Manual

API Access


The PingPlotter API will give you the ability to do things like create or delete Agents or Users. You can even start and stop traces.

Give it a try!

The PingPlotter API is currently in early preview. Please contact support to gain access!

Create an API Token

To create an API Key go to Manage --> API Access -->Create API Access Key.

Create a new API Key.

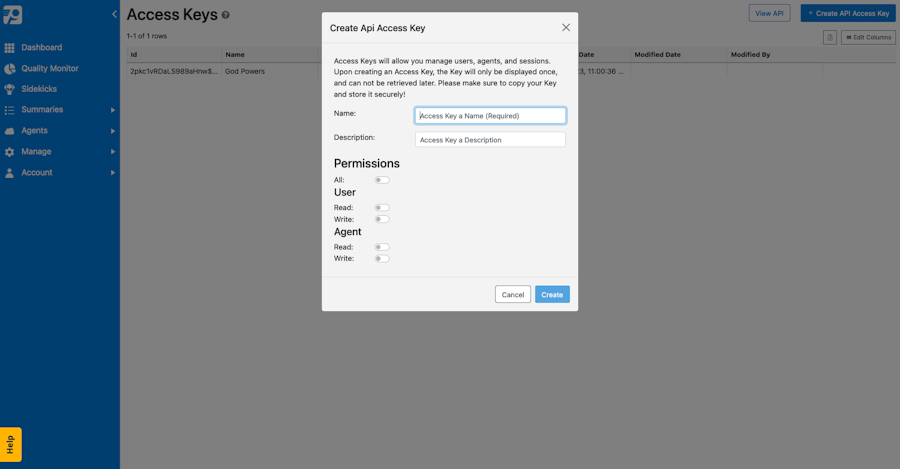
Give this key a name and a short description so that you can easily remember what it's being used for. Select the appropriate permissions for this key and hit Create.

Click the View API button to run test calls.

Once created, be sure to copy your key and store it in a safe place! After you close this modal you won't be able to access it again.

The View API button will take you to our API documentation where you can do some test calls before implementing the solution in your own system.

Use Cases

Here are some examples of how you could use the API:

  1. User Management
  2. Agent Management
  3. Agent Scheduling
  4. Create an Agent from a Ticket

User Management

To automate the user management process, use the /users endpoint.

Here's how to create a user:

curl -X 'POST' \
  'https://yoursubdomain.api.pingplotter.cloud/api/users' \
  -H 'accept: application/json' \
  -H 'X-API-KEY: ' \
  -H 'Content-Type: application/json' \
  -d '{
  "Name": "Testy Tester",
  "EmailAddress": "test@test.test",
  "Roles": [
    "TargetManagement"
  ]
}

Response:

{
  "Id": "u1:FpeVIOlPMulPbX1OyvA",
  "LastLogin": "0001-01-01T00:00:00+00:00",
  "TwoFactorEnabled": false,
  "Name": null,
  "EmailAddress": "test@test.test",
  "Roles": [
    "TargetManagement"
  ]
}

To delete a user, you first need to get the User ID:

curl -X 'GET' \
  'https://yoursubdomain.api.pingplotter.cloud/api/users' \
  -H 'accept: application/json' \
  -H 'X-API-KEY: '
[
  {
    "Id": "userID",
    "LastLogin": "2023-08-21T18:52:45.6834746+00:00",
    "TwoFactorEnabled": true,
    "Name": "Tony Hawk",
    "EmailAddress": "tony@hawk.com",
    "Roles": null
  },
  {
    "Id": "",
    "LastLogin": "0001-01-01T00:00:00+00:00",
    "TwoFactorEnabled": false,
    "Name": Testy Tester,
    "EmailAddress": "test@test.test",
    "Roles": [
      "TargetManagement"
    ]
  }
]

Then delete the user:

curl -X 'DELETE' \
  'https://yoursubdomain.api.pingplotter.cloud/api/users/' \
  -H 'accept: application/json' \
  -H 'X-API-KEY: '

Agent Management

To automate management of Agents, for example during employee on/offboarding, use the /agents endpoint.

Here's how to create the Agent:

curl -X 'POST' \
  'https://yoursubdomain.api.pingplotter.cloud/api/agents' \
  -H 'accept: application/json' \
  -H 'Content-Type: application/json' \
   -H 'X-API-KEY: '
  -d '{
  "Name": "string",
  "IsTemplate": true,
  "IsSidekick": true
}'

You'll need the Agent UniqueID before you can delete it:

curl -X 'GET' \
  'https://yoursubdomain.api.pingplotter.cloud/api/agents?includeTemplates=false&includeDeleted=false' \
  -H 'accept: application/json' \
  -H 'X-API-KEY: '
[
  {
    "Name": "raspberrypi",
    "UniqueId": "jksoihf0i2309lkjsdf",
    "IsOnline": true,
    "IsTemplate": false,
    "OpenSessions": 5,
    "TotalSessions": 5,
    "Configured": true,
    "LastMessageTime": "2023-08-14T08:09:12.620545+00:00",
    "MachineID": "",
    "Platform": "Linux",
    "ServiceRunning": true,
    "MachineName": "raspberrypi",
    "MostRecentIPAddress": "",
    "ClientDetails": "",
    "Deleted": false,
    "DeletionDate": null,
    "Notes": null,
    "UserAttributesJson": null,
    "Servers": null,
    "HasSyncedServers": false,
    "CustomFieldsJSON": "{\"Custom1\":\"\",\"Custom2\":\"\",\"MachineName\":\"raspberrypi\",\"Platform\":\"5\",\"Version\":\"5.23.3\",\"VersionGroupName\":\"\",\"Region\":\"Sidekick Cloud\",\"Custom4\":\"Disney\"}",
    "OnWifi": false,
    "OnVPN": false,
    "CurrentNetworkInterface": {
      "IPv6Priority": 0,
      "IPv4Priority": 0,
      "Name": "",
      "RawName": "",
      "Type": "Ethernet",
      "IP": "",
      "Status": "Up",
      "Description": "eth0",
      "Id": "eth0",
      "ConnectedWith": true,
      "SignalPercentage": -1,
      "NoisePercentage": -1,
      "UsedInConfigs": []
    },
    "AutoApprove": null,
    "TemplateUniqueId": null,
    "DownloadUrl": "https://pingplotter.cloud/monitor?configLinkId="
  }
]

Then delete it:

curl -X 'DELETE' \
  'https://yoursubdomain.api.pingplotter.cloud/api/agents' \
  -H 'accept: application/json' \
  -H 'X-API-KEY: ' \
  -H 'Content-Type: application/json' \
  -d '{
  "UniqueId": "",
  "ShouldUninstall": true
}'

Agent Scheduling

If you only care about collecting data or receiving alerts during your Agents' working hours then this is the case for you. You'll end up using the API to start an Agent's trace as they come on shift, and pause the trace as they leave for the day.

You'll need each PingPlotter Cloud Agent's Unique ID to start/stop the traces:

curl -X 'GET' \
  'http://yoursubdomain.api.pingplotter.cloud/api/agents?includeTemplates=false&includeDeleted=false' \
  -H 'accept: application/json' \
  -H 'X-API-KEY: '
[
  {
    "Name": "string",
    "UniqueId": "string",
    "IsOnline": true,
    "IsTemplate": true,
    "OpenSessions": 0,
    "TotalSessions": 0,
    "Configured": true,
    "LastMessageTime": "2023-08-21T17:10:05.112Z",
    "MachineID": "string",
    "Platform": "string",
    "ServiceRunning": true,
    "MachineName": "string",
    "MostRecentIPAddress": "string",
    "ClientDetails": "string",
    "Deleted": true,
    "DeletionDate": "2023-08-21T17:10:05.112Z",
    "Notes": "string",
    "UserAttributesJson": "string",
    "Servers": "string",
    "HasSyncedServers": true,
    "CustomFieldsJSON": "string",
    "OnWifi": true,
    "OnVPN": true,
    "CurrentNetworkInterface": {
      "IPv6Priority": 0,
      "IPv4Priority": 0,
      "Name": "string",
      "RawName": "string",
      "Type": "string",
      "IP": "string",
      "Status": "string",
      "Description": "string",
      "Id": "string",
      "ConnectedWith": true,
      "SignalPercentage": 0,
      "NoisePercentage": 0,
      "UsedInConfigs": [
        "string"
      ]
    },
    "AutoApprove": true,
    "TemplateUniqueId": "string",
    "DownloadUrl": "string"
  }
]

Here's how to start the traces:

curl -X 'PUT' \
  'https://yoursubdomain.api.pingplotter.cloud/api/agents//sessions?action=Resume' \
  -H 'accept: application/json' \
  -H 'X-API-KEY: '

And pause the traces:

curl -X 'PUT' \
  'https://yoursubdomain.api.pingplotter.cloud/api/agents//sessions?action=Pause' \
  -H 'accept: application/json' \
  -H 'X-API-KEY: '

Create an Agent from a Ticket

There may be times when the help desk team wants to create an Agent quickly and respond with the Agent download link. This can be done using the /agents endpoint.

curl -X 'POST' \
  'https://yoursubdomain.api.pingplotter.cloud/api/agents' \
  -H 'accept: application/json' \
  -H 'X-API-KEY: ' \
  -H 'Content-Type: application/json' \
  -d '{
  "Name": "",
  "IsTemplate": false,
  "IsSidekick": false
}'
{
  "Name": "New Agent",
  "UniqueId": "8opxhhurw5ewdg17ywr834u8ar",
  "IsOnline": false,
  "IsTemplate": false,
  "OpenSessions": 0,
  "TotalSessions": 0,
  "Configured": false,
  "LastMessageTime": null,
  "MachineID": null,
  "Platform": "NotSpecified",
  "ServiceRunning": false,
  "MachineName": null,
  "MostRecentIPAddress": null,
  "ClientDetails": null,
  "Deleted": false,
  "DeletionDate": null,
  "Notes": null,
  "UserAttributesJson": null,
  "Servers": null,
  "HasSyncedServers": false,
  "CustomFieldsJSON": null,
  "OnWifi": null,
  "OnVPN": null,
  "CurrentNetworkInterface": null,
  "AutoApprove": null,
  "TemplateUniqueId": null,
  "DownloadUrl": "https://pingplotter.cloud/monitor?configLinkId=n9n6tb3bugwruyfr5y6g4qywha"
}

Grab the "DownloadUrl" and make that available for the technician.