

Version 5 Manual
File Menu
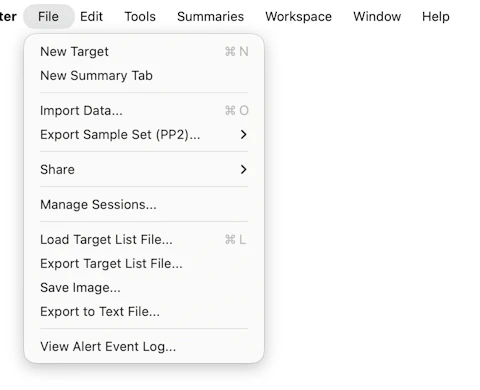
- New Target..: This will create a new empty target area where you can trace to a new instance. See the documentation on "Tracing to Multiple Targets" for more details.
- New Summary Tab: In PingPlotter Pro - this will create a new summary tab (we cover custom summary tabs in more detail here).
- Clear Workspace: In PingPlotter Pro - this will clear out your current workspace
- Import Sample Set.. : Loads a previously saved sample set. The default extension for PingPlotter saved sample files is .pp2, or PingPlotter save file format.
- Export Sample set...: Allows you to save the current sample set to an external file. These files are saved in .pp2, or PingPlotter's save file format.
- Manage Sessions: Opens the session browser, where you can open, export, or delete previous trace sessions
- Load Target List File : Allows a list of targets to be loaded into PingPlotter
- Save Image. : Saves the current graph in .png, .gif or .bmp format. See the Autosave section for information on how to automate the saving of graph images.
- Export to Text file.. : Exports trace data to a comma delimited text file. Click here for an explanation of the export options available from PingPlotter.
- View Alert Events Log: Opens a log that displays information on when/why any alerts may have fired.
- Exit : Exits PingPlotter. By default you'll be prompted to save your current sample set if you haven't done so already (click here to see how to change this option).
Some of the features listed in this topic are only available in PingPlotter Pro and/or PingPlotter Standard. See our product comparison page for details.