Troubleshooting Tips
How to troubleshoot Zoom
If you're experiencing stuttering, call dropouts, or otherwise poor call quality with Zoom, this guide can help you narrow down the root cause.
Zoom is a popular virtual meeting/teleconferencing software, and like most voice/video chat services, it can be very sensitive to poor or inconsistent network conditions.
By using a free network troubleshooting tool (like PingPlotter), you can identify if the issues with your call quality are caused by a problem locally, an issue with your ISP, or with Zoom itself.
Setting up PingPlotter
To troubleshoot your network connection to Zoom using this guide, you will need to download and install the latest version of PingPlotter. A 14-day free trial is always available to help you get started.
For troubleshooting Zoom, you can use PingPlotter’s default settings.
What to target
Zoom has a list of servers and their IP addresses. However, there is not currently an easy method of identifying which you are using for each call. We went through Zoom’s list and selected a group of servers covering most regions.
You can click on the links below to automatically launch a PingPlotter trace to the server you think is closest to you (if the link does not open PingPlotter, you can also enter the IP address of the server into PingPlotter's Target Bar).
- Australia: 202.177.213.97
- Canada: 64.69.74.1
- China: 52.81.151.129
- Germany: 3.127.194.12
- India: 3.7.35.1
- Japan: 52.197.97.21
- USA - California: 160.1.56.129
- USA - Colorado: 4.35.64.129
- USA - Louisiana: 4.34.125.129
- USA - Virginia: 3.235.69.1
- USA - Washington: 3.101.32.129
Step-by-step instructions
1. Check the status of Zoom’s service
If you have not already, check Zoom’s service status page to see if they are currently experiencing any known downtime. If so, this is most likely the cause of your issue.
2. Check your general connection
You can quickly identify basic network issues by starting a PingPlotter trace to a reliable target (such as Google.com). Enter “google.com” Into PingPlotter’s Target Bar and click the green Start button, or use the link below to start tracing automatically.
If you see high latency or packet loss, your network issue may be broader than just Zoom. See our guide on solving common network problems to identify what might be the culprit.
3. Check your connection to Zoom's servers
Using one of the targets above, start tracing to the Zoom server closest to you. While the trace runs in PingPlotter, start a call in Zoom. If you experience any issues (such as stuttering or freezes), check PingPlotter to see if you see any sudden spike in latency or packet loss. Make note of this and continue testing.
We recommend collecting 10 minutes of data at a minimum for the most accurate results.
Once you have your PingPlotter results, use the information below to narrow down your issue.
What to look for
There are many issues that could be affecting your Zoom call quality. Here are some of the most common:
Device completely "down"
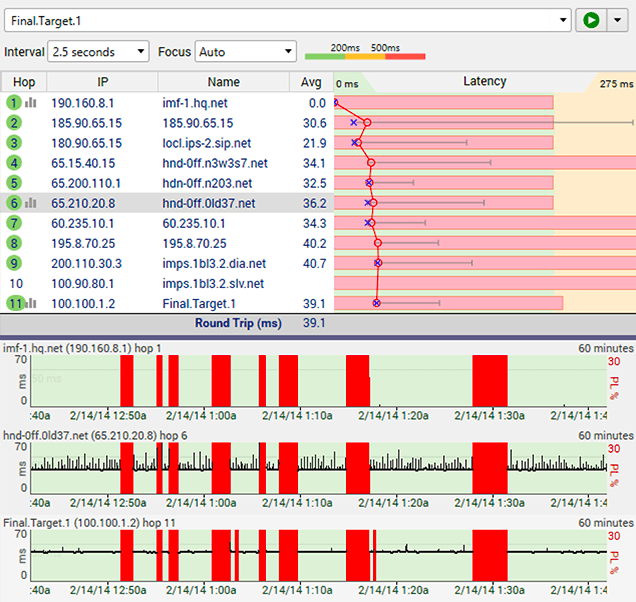
This result would show a bunch of solid red bars from the beginning of the route to the end. It can also start a “hop” or two down the line.
What do I do if I see this?
- If it’s starting at the very beginning of the trace, try giving your router a reboot.
- If that doesn’t help, and the pattern persists after you’ve given it a reboot, you may need to look into a replacement router.
- If the red is starting a hop or two down, contact your ISP.
WiFi interference
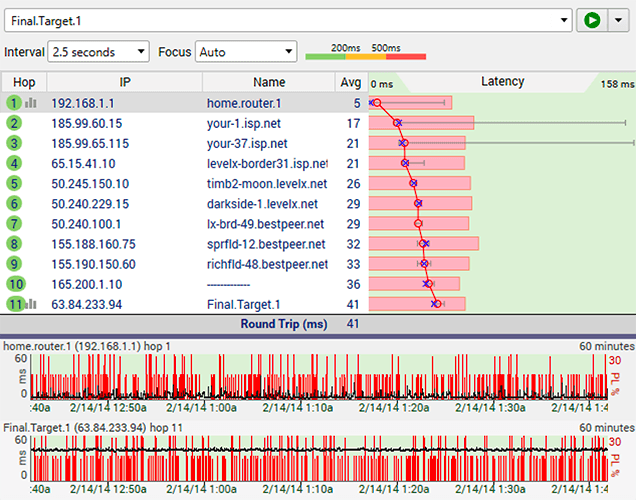
With this, we’ll see some red beginning at the start of the route similar to what we saw with a device being down, but more sporadic. This is normally caused by poor WiFi access point placement or by too many networks broadcasting nearby (apartment complexes are notorious for this).
What do I do if I see this?
- You can try a router or WiFi access point reboot right off the bat.
- Switch to a different wireless band. Most WiFi access points these days have dual-band; try to hop onto the other band temporarily.
- If the above isn’t possible, you may want to look at where you put your router or WiFi access point. Make sure that it is away from metal (including electrical conduit), and is away from televisions, microwaves, and Bluetooth devices like speakers.
- You may be experiencing saturation on your current WiFi channel. You can research the model of router or WiFi access point you have, and search for “channels”. You might want to set the device to switch channels automatically or search for a channel that isn’t being overused by nearby networks.
- If that doesn’t shape it up, you can acquire an Ethernet cable and plug your computer directly into your router. We always recommend a wired connection over a wireless one.
Bandwidth saturation
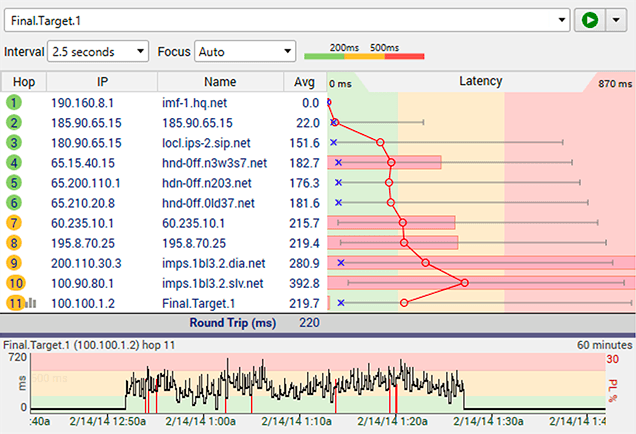
Normally, the pattern that indicates that you’re overusing your bandwidth would look like the above: an almost sawtooth-like pattern, which may or may not have a clear start and stop point.
What do I do if I see this?
- Use less bandwidth by limiting your demand on your connection. Close down music streaming, video streaming, and so forth.
- Throttle your network. This one’s a bit harder. Search for the model of router you have, and add terms like “rate limiting” or “bandwidth limiting”. That should get you to an explanation of how to throttle back the traffic a bit.
- If this continues to be an issue, you may need to contact your ISP and ask if you have a higher bandwidth tier available to you.
Helpful resources
We've compiled a list of useful links to help you find additional support information.
Do you support remote workers?
When remote workforces have connection trouble PingPlotter Cloud helps you find the problem and get everyone back online fast.
